Getting Started Using Elastic Beanstalk
Getting Started Using Elastic Beanstalk
The following tasks will help you get started with Elastic Beanstalk to create, view, deploy, and update your application as well as edit and terminate your environment. You'll use the AWS Management Console, a point-and-click web-based interface, to complete these tasks.
Step 1: Sign up for the Service
If you're not already an AWS customer, you'll need to sign up. Signing up allows you to access Elastic Beanstalk and other AWS services that you will need, such as Amazon Elastic Compute Cloud (Amazon EC2), Amazon Simple Storage Service (Amazon S3), and Amazon Simple Notification Service (Amazon SNS).
To sign up for an AWS account
- Open the Elastic Beanstalk console.
- Follow the instructions shown.
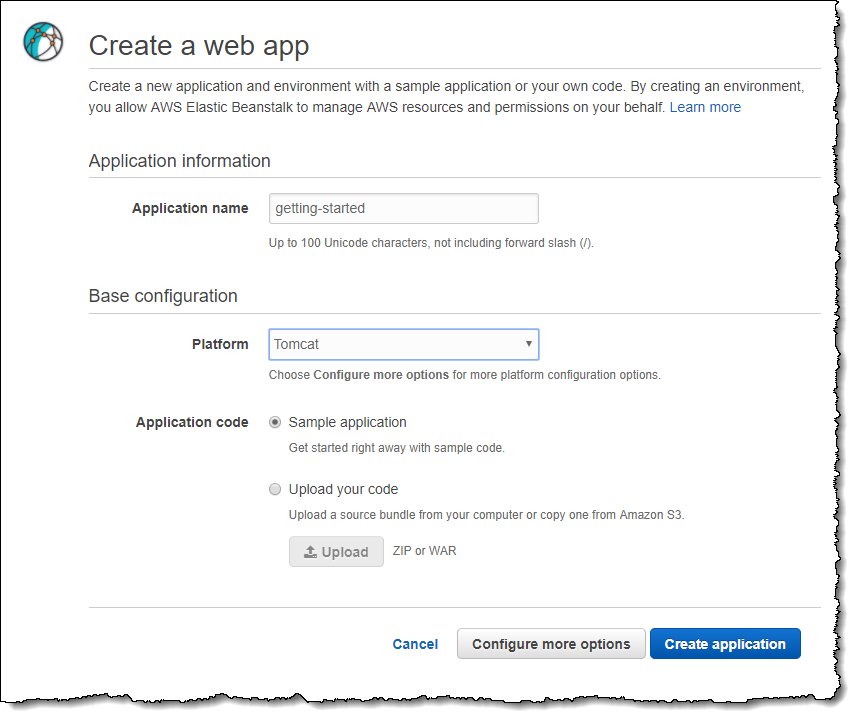
Step 2: Create an Application
Next, you will create and deploy a sample application. For this step, you use a sample application that is already prepared.
Elastic Beanstalk is free to use, but the AWS resources that it provides will be live (and not running in a sandbox). You will incur the standard usage fees for these resources until you terminate them in the last task in this tutorial. The total charges will be minimal (typically less than a dollar). For information on how you might minimize any charges, go to http://aws.amazon.com/free/.
To create a sample application
- Open the Elastic Beanstalk Management Console with this preconfigured link: https://console.aws.amazon.com/elasticbeanstalk/home#/newApplication?applicationName=getting-started&environmentType=LoadBalanced
- Choose a platform and then choose Review and launch.
- Review the available settings and choose Create app.
To run a sample application on AWS resources, Elastic Beanstalk takes the following actions, which takes about 5 minutes to complete:
- Creates an Elastic Beanstalk application named getting-started.
- Launches an environment named Custom-env with the following AWS resources:
- EC2 instance – An Amazon Elastic Compute Cloud (Amazon EC2) virtual machine configured to run web apps on the platform that you choose.Each platform runs a different set of software, configuration files, and scripts to support a specific language version, framework, web container, or combination thereof. Most platforms use either Apache or nginx as a reverse proxy that sits in front of your web app, forwards requests to it, serves static assets, and generates access and error logs.
- Instance security group – An Amazon EC2 security group configured to allow ingress on port 80. This resource lets HTTP traffic from the load balancer reach the EC2 instance running your web app. By default, traffic is not allowed on other ports.
- Load balancer – An Elastic Load Balancing load balancer configured to distribute requests to the instances running your application. A load balancer also eliminates the need to expose your instances directly to the Internet.
- Load balancer security group – An Amazon EC2 security group configured to allow ingress on port 80. This resource lets HTTP traffic from the Internet reach the load balancer. By default, traffic is not allowed on other ports.
- Auto Scaling group – An Auto Scaling group configured to replace an instance if it is terminated or becomes unavailable.
- Amazon S3 bucket – A storage location for your source code, logs, and other artifacts that are created when you use Elastic Beanstalk.
- Amazon CloudWatch alarms – Two CloudWatch alarms that monitor the load on the instances in your environment and are triggered if the load is too high or too low. When an alarm is triggered, your Auto Scaling group scales up or down in response.
- AWS CloudFormation stack – Elastic Beanstalk uses AWS CloudFormation to launch the resources in your environment and propagate configuration changes. The resources are defined in a template that you can view in the AWS CloudFormation console.
- Domain name – A domain name that routes to your web app in the form
subdomain.region.elasticbeanstalk.com.
- Creates a new application version named Sample Application, which refers to the default Elastic Beanstalk sample application file.
- Deploys the sample application code to Custom-env.
During the environment creation process, the console tracks its progress and displays events:

When all of the resources finish launching and the EC2 instances running the application pass health checks, the environment's health changes to
Ok and the website becomes ready to use.Step 3: View Information About Your Environment
After you create the Elastic Beanstalk application, you can view information about the application you deployed and its provisioned resources by going to the environment dashboard in the AWS Management Console. The dashboard shows the health of your application's environment, the running version, and the environment configuration.
While Elastic Beanstalk creates your AWS resources and launches your application, the environment will be in a
Pending state. Status messages about launch events are displayed in the environment's dashboard.
If you are not currently viewing the Dashboard, return to it now:
To view the dashboard
- Open the Elastic Beanstalk console.
- Choose Custom-env

The dashboard shows a subset of useful information about your environment, including its current health status, the name of the currently deployed application version, its five most recent events, and the platform configuration on which the application runs.
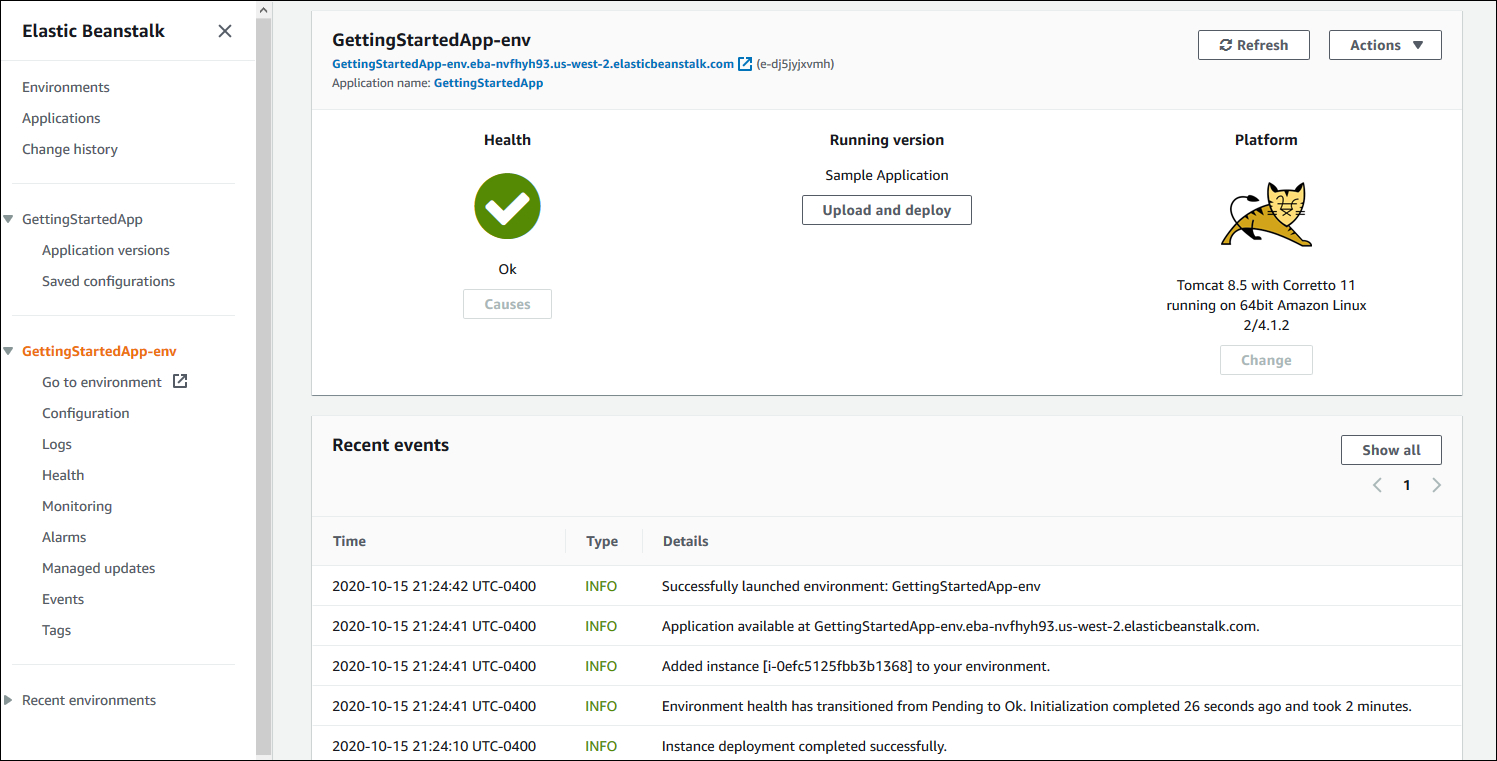
On the left hand side of the console is a navigation bar that links to other pages, which contain more detailed information about your environment and provide access to additional features. Explore the following pages to see the current state of your environment:
- The Configuration page shows the resources provisioned for this environment, such as Amazon EC2 instances that host your application. This page also lets you configure some of the provisioned resources.
- The Health page shows the status and detailed health information about the EC2 instances running your application.
- The Monitoring page shows the statistics for the environment, such as average latency and CPU utilization. This page also lets you create alarms for the metrics that you are monitoring.
- The Events page shows any informational or error messages from services that this environment is using.
Step 4: Deploy a New Application Version
You can deploy a new version of your application at any time, as long as no other update operations are currently in-progress on your environment.
The application version you are running now is labeled Sample Application.
To update your application version
- Download one of the following sample applications that match the configuration for your environment:
- Single Container Docker – docker-singlecontainer-v1.zip
- Multicontainer Docker – docker-multicontainer-v2.zip
- Preconfigured Docker (Glassfish) – docker-glassfish-v1.zip
- Preconfigured Docker (Python 3) – docker-python-v1.zip
- Preconfigured Docker (Go) – docker-golang-v1.zip
- Go – go-v1.zip
- Java SE – java-se-jetty-gradle-v3.zip
- Tomcat – java-tomcat-v3.zip
- .NET – dotnet-asp-v1.zip
- Node.js – nodejs-v1.zip
- PHP – php-v1.zip
- Python – python-v1.zip
- Ruby (Passenger Standalone) – ruby-passenger-v2.zip
- Ruby (Puma) – ruby-puma-v2.zip
- Open the Elastic Beanstalk console.
- From the Elastic Beanstalk applications page, choose My First Elastic Beanstalk Application and then choose Custom-env.
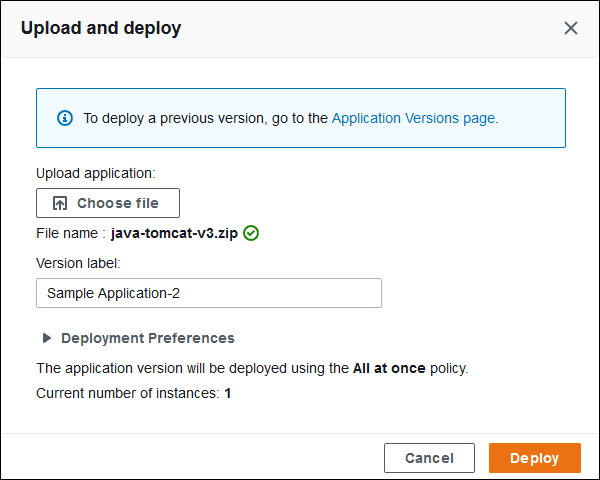
- In the Overview section, choose Upload and Deploy.
- Choose Browse and upload the sample source bundle that you downloaded.
- The console automatically fills in the Version label based on the name of the archive that you uploaded. For future deployments, you will need to type a unique version label if you use a source bundle with the same name.
- Choose Deploy.
Elastic Beanstalk now deploys your file to your Amazon EC2 instances. You can view the status of your deployment on the environment's dashboard. The Environment Health status turns grey while the application version is updated. When the deployment is complete, Elastic Beanstalk performs an application health check. The status returns to green when the application responds to the health check. The environment dashboard will show the new Running Version as Sample Application Second Version (or whatever you provided as the Version label.
Your new application version is also uploaded and added to the table of application versions. To view the table of application versions, choose My First Elastic Beanstalk Application and then choose Application Versions.
Step 5: Change Configuration
You can customize your environment to better suit your application. For example, if you have a compute-intensive application, you can change the type of Amazon EC2 instance that is running your application.
Some configuration changes are simple and happen quickly. Some changes require Elastic Beanstalk to delete and recreate AWS resources, which can take several minutes. Elastic Beanstalk will warn you about possible application downtime when changing configuration settings.
In this task, you change the minimum instance settings for your Auto Scaling group from one to two and then verify that the change occurred. After the new instance gets created, it will become associated with your load balancer.
To change your environment configuration
- Open the Elastic Beanstalk console.
- Navigate to the management page for your environment.
- Choose Configuration.
- Choose Scaling.
- In the Auto Scaling section, change Minimum Instance Count from
1to2. This increases the minimum number of Auto Scaling instances deployed in Amazon EC2. - At the bottom of the page, choose Apply.

The environment update might take a few minutes. When the environment is ready, you can go to the next task to verify your changes.
To verify changes to load balancers
- In the navigation pane, choose Events.You will see the event Successfully deployed new configuration to environment in the events list. This confirms that the Auto Scaling minimum instance count has been set to 2. A second instance is launched automatically.
- Open the Amazon EC2 console at https://console.aws.amazon.com/ec2/.
- In the navigation pane, under LOAD BALANCING, click Load Balancers.
- Repeat the next two steps until you identify the load balancer with the desired instance name.
- Choose a load balancer in the list of load balancers.
- Choose the Instances tab in the Load Balancer: <load balancer name> pane, and then look at the Name in the Instances table.The information shows that two instances are associated with this load balancer, corresponding to the increase in EC2 instances.

Step 6: Clean Up
Congratulations! You have successfully deployed a sample application to the cloud, uploaded a new version, and modified its configuration to add a second Auto Scaling instance. To make sure you are not charged for any services you don't need, delete any unwanted applications and environments from Elastic Beanstalk and AWS services.
To completely delete the application
- Delete all application versions.
- Open the Elastic Beanstalk console.
- From the Elastic Beanstalk applications page, choose Custom-env in the My First Elastic Beanstalk Application application.
- Choose Upload and Deploy.
- When prompted for an application, choose Application Versions page.
- On the Application Versions page, select all application versions that you want to delete, and then choose Delete.
- Confirm the versions that you are deleting, and then click Delete.
- Choose Done.
- Terminate the environment.
- Go back to the environment dashboard by clicking My First Elastic Beanstalk Application and then Custom-env.
- Choose Actions and then choose Terminate Environment.
- Confirm that you are terminating
Custom-envand then choose Terminate.
- Delete the
My First Elastic Beanstalk ApplicationElastic Beanstalk application.- Choose Elastic Beanstalk at the upper left to return to the main dashboard.
- From the Elastic Beanstalk applications page, choose Actions for the My First Elastic Beanstalk Application application and then choose Delete Application.
- Confirm that you want to delete this Elastic Beanstalk application by clicking Delete.


Comments
Post a Comment